
As you work with the permitting system, you will encounter a variety of pages and yet there are interface fundamentals that remain consistent throughout. On nearly every page, you will find the Menu Bar, Command Buttons, Entry Fields, and the Status Bar.
Warning! When you use your browser’s Forward and Back buttons, you may lose information entered on the current page unless you are careful to Save your work before going to the next or previous page.
Use the Features Bar to navigate quickly between the pages of an application, to copy the contents of an application/permit, or to perform a variety of Actions.
Copy – click this button to duplicate the contents of an application
Open – click this button access the pages of the selected application
Actions – expand this drop-down and choose an action that you wish to apply to the currently selected record
Make a Payment – click this button to access the Payment page of the currently selected record
Remove – click this button to remove the selected record from your queue
Revise – click this button to edit an issued permit
Print Permit – click this button to generate a hard copy of the document
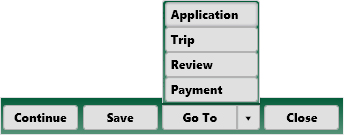
Continue – click this button to evaluate an application for missing information then proceed to the next page
Save – click this button to create a record of your unfinished application for later use
Go To – expand this drop-down to navigate the pages of an application
Application – click this button to access the Application page of the open application or permit
Trip – use the Trip page to plan and evaluate your route
Review – click this button to access the Review page of the open application or permit
Payment – click this button to access the Payment page of the open application or permit
Close – click this button to close an application
The Progress Bar shows the workflow for completing an application and provides a quick way to move from page to page. Click the link of or drag the slider to the page you wish to open.

Application – On the Application page, designate your travel dates then supply Carrier, Vehicle, Axle, Load, and Overall Dimension information.
Trip – Use the Trip page to plan and evaluate your route.
Review – The Review page presents all of the application information collected in one place.
Payment – Use the Payment page to view fees, establish a delivery method, and pay for permits.
Command buttons such as Continue and Back control your progress through workflows. Buttons like Submit, Open, and Delete generate interaction between the database and the working record. Many buttons are unique to certain pages, but their functions are largely self-explanatory (for example, Print Permit, View Application, Revise).
Fields with a gray background are for display only; you cannot enter or modify any information that appears in a disabled field.
Only fields with a white background can be edited.
Any edit-able field title accompanied by an asterisk (*) is a required field. If you do not enter any information in this field, an error message displays when you try to save changes.
For security, all Password fields display any text entered as asterisks (*).
Drop-down lists (denoted by the down arrow at the far right of the field) require you to select from the existing options. You cannot enter text in this field.
Any button with darkened edges is marked as the default button (Microsoft standard). Pressing the Enter key on your keyboard is the same as clicking the outlined button.
To choose a date for the field, click anywhere in the field and select the desired date.
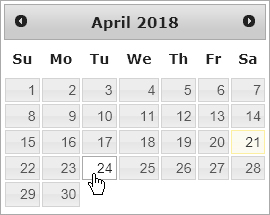
Click (<) to access the previous month.
Click (>) to advance the calendar by one month.
Click on a specific date (ex. 24) to enter that date in the associated field.
The Status Bar presents useful information about an open application. Take care to note the Application ID of any application you create; this number will come in handy if you can't finish the application in a single sitting or if you would like to re-use the information for another application.
